In this review of sandbag training, you'll learn why sandbags are among the most effective, truly functional training tools you can use.
The first time I worked with a sandbag was actually many years ago...I was a short-track speedskater when I was a teenager and one of the training techniques I used was a slideboard...then I'd have a tiretube filled with sand slung across my back (which weighed about 50 lbs). I'd slide back and forth in a skating motion to build back and leg strength.
That was GREAT training, let me tell you.
Sandbags can be use for a variety of exercises, from lifting, throwing, turning, pressing, pulling and carrying. Below, this is me finishing up a two mile, long-distance loaded carry with a 150 lb sandbag on my back.
Sand is VERY unstable. Lifting a sandbag is NOT like lifting barbells or dumbbells.
Sand shifts constantly as you're lifting it - it slides around and changes shape. Therefore EVERY exercise you do is an exercise in stabilization training.
This means more practical strength can be built AND more overall calories will be burned in a given workout.
You can do a multitude of exercises with sandbags, ranging from almost all the conventional stuff like presses, curls, rows, etc. to exercises that can ONLY be done with sandbags, like bearhug walking, pizza tosses, shouldering, that kind of thing.
I have to say, for a person like me who LOVES unique training methods, the sandbag has been a GOLDMINE of cool stuff. I'm going to share a few of those with you later in this review so you can see what I'm talking about.
The Benefits of Sandbag Training
First, let's talk about the "pros" of sandbag training in general.
1. Unstable
I mentioned this above. Whenever you use the sandbag for an exercise, the sand never stays in the same position. If you've ever gone for a run in the sand, it's a similar concept. The shifting of the sand requires MUCH greater activation of your stabilizer muscles.
2. Functional
Sandbag training is about the most functional training you can do. Forget standing on a Bosu ball catching bean bags. Stand on the floor and heave a sandbag up to your shoulder then bring it down to your midsection, then heave it up to your other shoulder. THAT is functional.
3. Practical and Safe
If you train at home, the sandbag will soon be your best friend. It takes up very little space (it's a bag of sand) and you can do a TON of exercises with it. You can also drop it without breaking it AND without breaking your floor. You can also drop it on your foot and your toe won't shoot across the room (which is always nice!).
The sandbag is also excellent for training while travelling (more so by car than by plane, of course, unless you empty the sand out and fill it back up again when you arrive at your destination). Just throw the sandbag in your trunk and you're set. It has the added bonus of being very useful if you're travelling in the winter and find yourself stuck in the snow.
4. Versatile
The number of exercises and movements you can do with a sandbag is staggering. Josh has a TON of exercises you can work with just on his YouTube channel. I've been busy coming up with all kinds of unique things. And I have to say, I'm sure I've only just scratched the surface of what can be done with it.
5. Fun!
To me, machine training is boring. There's no challenge to it other than moving the handles forward and backward against resistance. Dull as dirt.
With sandbag training, you have to get your mind into it. If you don't, you drop the bag. It's challenging AND athletic. To me, that's fun. You have to constantly keep your mind on what you're doing and you're constantly challenging your body to react and adapt.
6. Targets the Right Muscle Fibers For Maximizing Results
Here's the thing...when you heave a bag of sand off the floor, you're working the explosive Type II muscle fibers. These are the fibers that have the most growth and strength potential. Certainly, you can do some endurance work with sandbags but for strength-building, THAT is where they shine.
7. Works Your Body as a UNIT
One of my favorite things about sandbag training is that it works your body as a complete unit rather than in parts. When you push-press a sandbag or clean it off the floor or heave it over your shoulder, you're not doing a shoulder exercise...you're doing a total-body exercise.
This means you're getting more done in your workouts, you're burning more calories, boosting your metabolism AND teaching your body how to function as a whole, not as a bunch of separate, isolated parts.
The Downsides of Sandbag Training
There are a few negatives when it comes to sandbag training...not many, though, and you should definitely NOT let them stop you from trying this stuff.
1. It CAN Be Messy If Your Bag Leaks
It is, after all, a bag of sand. This can easily be solved by using a good quality bag (I'll tell you later what Josh did to make sure his sandbags don't make a mess).
2. Learning Curve
Heaving a sandbag off the ground and up to your shoulder isn't something you do the first time you use a sandbag, especially if you've been more used to machines and more "linear" movement like bench press and pulldowns.
Sandbag training takes some getting used to and it's important to learn proper form, especially considering how unstable the bags can be. There's a lot of room for error when doing a simple dumbbell curl - when you're heaving a sandbag from the floor up to your shoulders, learning proper technique is important for safety and best results.
3. You WILL Get Sore
This can be a pro or a con, depending on your outlook. Because sandbag training is so radically different than machines and even a lot of free weight training, soreness will happen. It IS a good thing, though, because it means you're working muscles that rarely get worked and you'll be a stronger person for it.
The Brand I Use and Recommend... Ultimate Sandbags
The sandbags I use and recommend are made by Coach Josh Henkin, out of Scottsdale Arizona. Josh has done a masterful job of maximizing the pros and minimizing the cons of sandbag training with his bags.
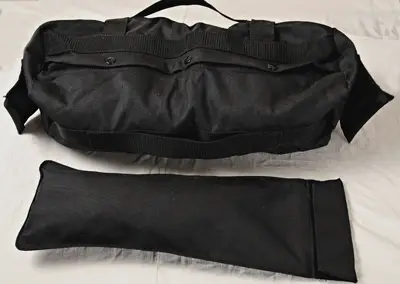
To keep the sand from spilling out, even during the toughest abuse, Josh uses a tightly-sealed inner bag where the sand actually goes into, and a heavy-duty canvas zippered outer bag, where all the straps and handles are.
This combination really minimizes spillage. I do get an occasional puff of dust out of the bag when I drop it from high up but it's hardly anything at all.
The multitude of handles and straps on the bags make them EXTREMELY useful for any number of exercises...much more so than the tiretube full of sand I used when I was younger.
And when it comes to toughness and quality of materials, Josh has definitely NOT taken any shortcuts. You can beat the crap out of these bags and they won't break. I've literally held my bag at arms-length overhead and slammed it to the ground as hard as I could and it came away just fine (the impact did set off the sump pump in my basement home-gym, but that's about it).
This is top-quality workmanship that'll last you a LONG time.
Josh's sandbags are also available in a number of sizes and potential weights (I say potential because they don't ship with sand included - you can just go to a home improvement store and buy playground sand for about 3 bucks per 50 lb bag).
I have a medium bag, which holds a filler bag of 50 lbs and a filler bag of 20 lbs (70 lbs total). This is a great place to start - you can do a LOT of exercises with this size of bag.
My next purchase is going to be the large bag that holds up to 140 lbs. Josh also has small bags which hold up to 30 lbs (a 20 lb filler bag and a 10 lb filler bag).
So basically, he's got bags for EVERY level of trainer and every range of weight you need. These bags and filler bags are available in package deals.
He's also got plenty of information available on HOW to use the sandbags, both on his YouTube channel and in several instructional books and DVD's that he offers on his site.
If you haven't gathered by now, I'm a big fan of sandbag training. As far as training equipment goes, I'd say having at least one in your arsenal is a MUST.
Even if you normally train at a commercial gym, having a sandbag available at home is perfect for days when you can't make it to the gym but still want to get in a challenging workout. Heck, maybe you can convince your gym to get some sandbags for members to use!
Bottom line, I HIGHLY recommend sandbag training and Josh Henkin's bags are the best in the business.
What Exercises Can You Do With a Sandbag?
You can perform many varieties of squats, lunges, split squats, presses (close grip for triceps and overhead for shoulders), cleans, throws, snatches, abdominal supports, weighted push-ups (with the bag on your back), carries (over your shoulder, on your back, cradled in your arms, in a bearhug), Turkish Get-Ups (starting laying your back then getting up while holding the sandbag), overhead squats and lunges, good mornings, hyperextensions...you name it, you can pretty much find a way to do it.
Sandbag Overhead Cleans
Sandbag Overhead Pops
First, grab the handles then clean the bag to your shoulders. The bag will be "racked" across your upper arms in the start position with your hands still on the handles.
Squat down then "pop" up with the bag in a push-press type of movement. The bag clears your head then you catch it on your upper back. Squat down again then "pop" the bag up and back over your head and catch it on the front again.
The first few times you do this exercise, use a stop-and-go movement, just to make sure you've got the mechanics down. The version you see below is a continuous pop, going straight from front to back to front, etc. without any stopping. This takes practice but works INCREDIBLY well for building explosive power (and cardio capacity).
Sandbag Pizza Throws
Clean the bag up to a cradle position. In this position, you've just got the bag cradled in your arms, without holding on to any straps.
Now comes the fun part...
Squat down a bit then heave the bag up in the air. But instead of throwing it straight up, instead heave it more with your right arm so the bag does a 180 degree turn in the air.
Catch the bag in your arms again. Now repeat in the OTHER direction, flipping the bag back over in the air.
Each time you throw it and catch it in this rotational manner, you're working your core EXTREMELY hard, especially the obliques. This rotational type of movement is very beneficial for athletic development and core strength.
Sandbag Shuttle Runs
Now for some high-intensity cardio training. This is NOT aerobic training by any stretch of the imagination. Each burst lasts about a minute (the demo includes 3 separate techniques).
Basically, this is just like the shuttle runs where you grab a bean bag and set it down then run back and touch the floor then grab another bean bag and set it down.
The difference here is that you'll be using a heavy sandbag instead of a bean bag! You can carry it on your back, throw it over a shoulder, cradle-carry it, etc.
There is one version where you never actually set the bag down but carry it on one shoulder at a time while you do a shuttle run, touching the ground at each turn. If you can imagine repeatedly running and touching the ground with a 70 lb bag of sand on your shoulder, you'll see how great sandbag training really is.
![]()
More From Fitstep.com
| The 4 Most Insane Bodyweight Exercises I've Ever Done | |
| 5 Fat-Loss Myths That Are KILLING Your Results | |
| Where Do I Start With Fitness? Start Here. | |
| Breathe Backwards For More Effective Pulldowns |
Share This Page...
---
Home -> Muscle and Strength -> Training Equipment Reviews -> Sandbags